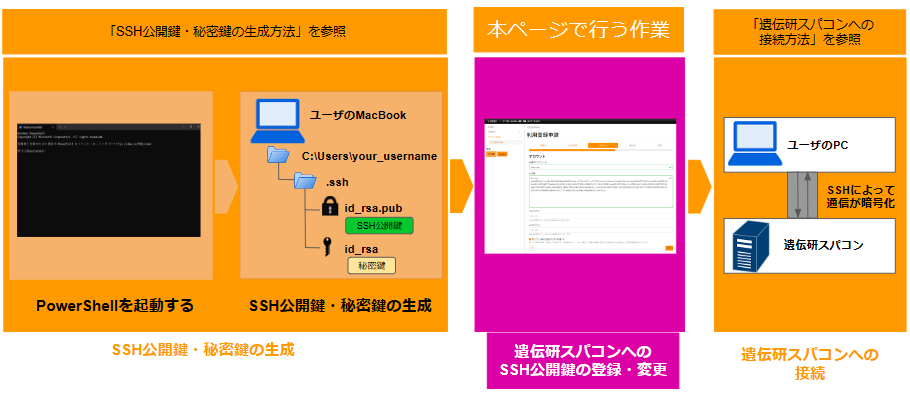
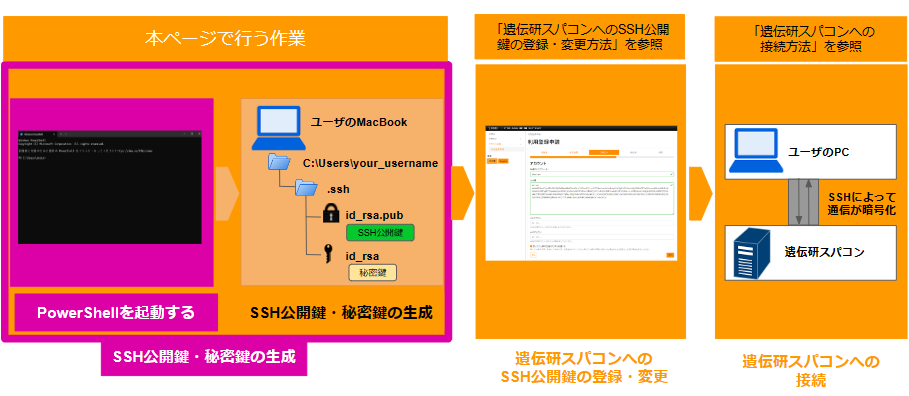
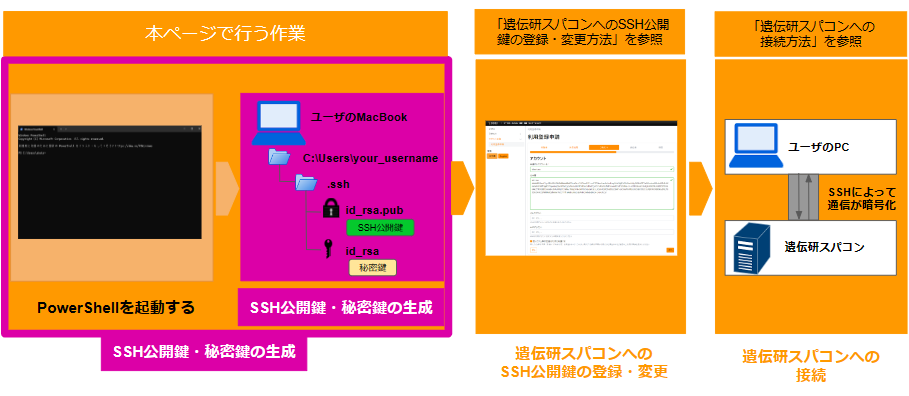
How to generate SSH public and private keys (Windows)
This page provides detailed completion instructions when creating SSH public key with Windows.
PowerShell, which comes standard with Windows, is used as an example.
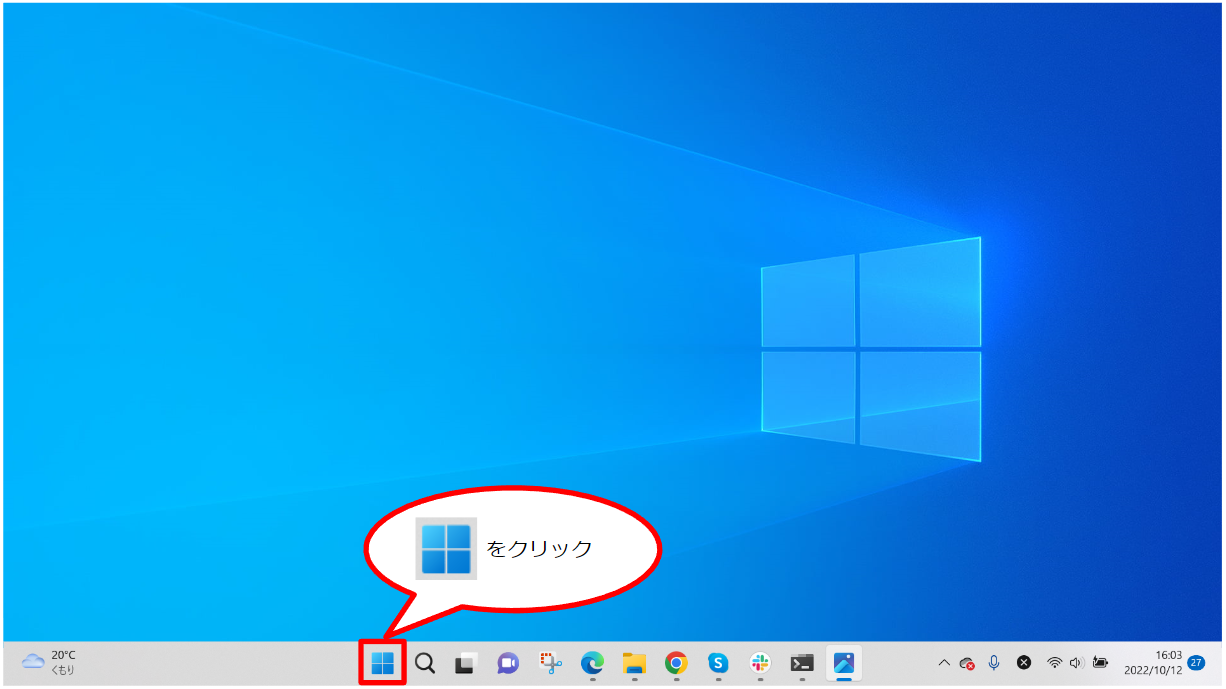
Open PowerShell
First, click the Windows symbol.
A search box appears. Click on "🔍 Type here to search". You can click anywhere in the search box.
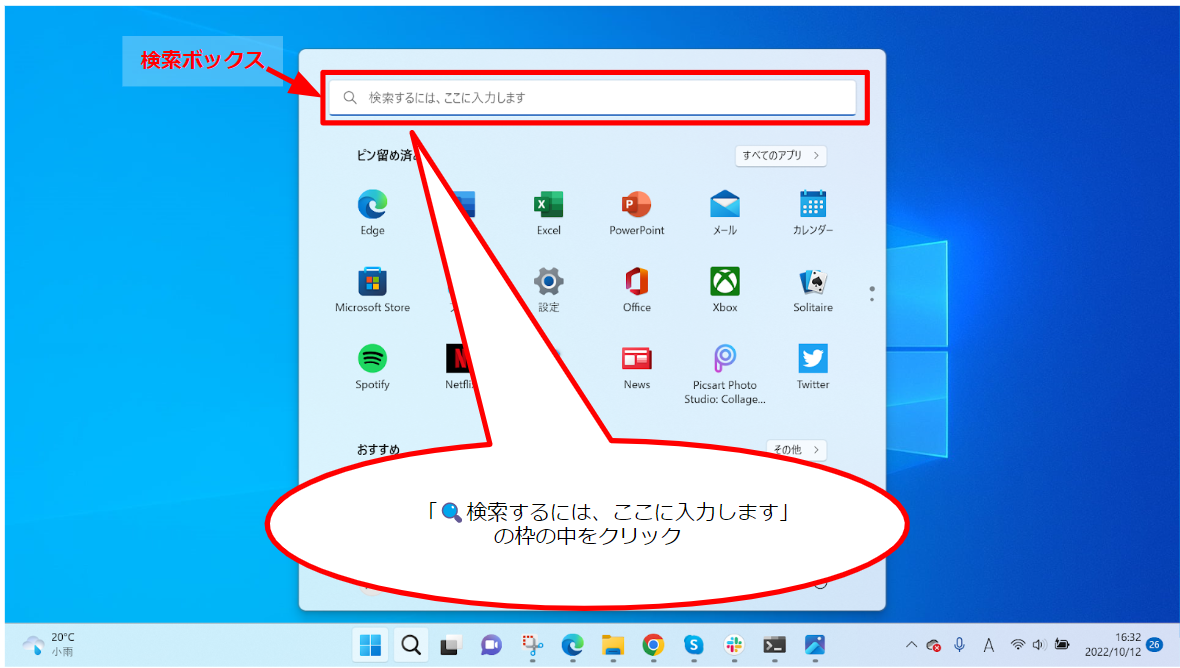
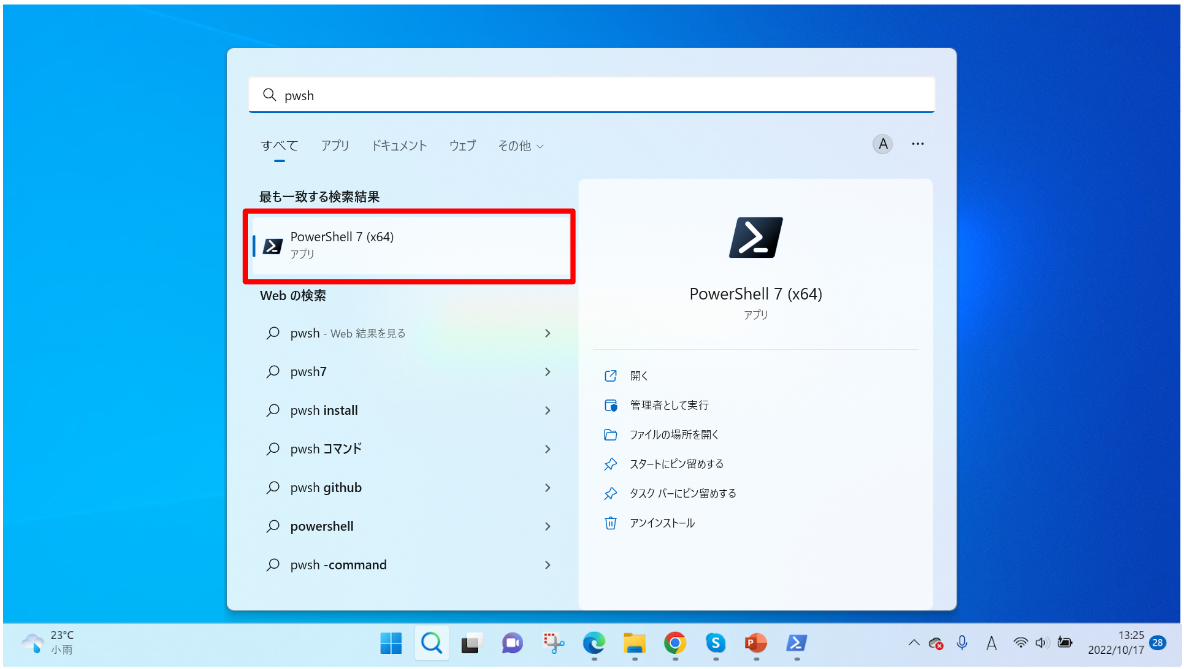
When clicked, the following image is displayed.
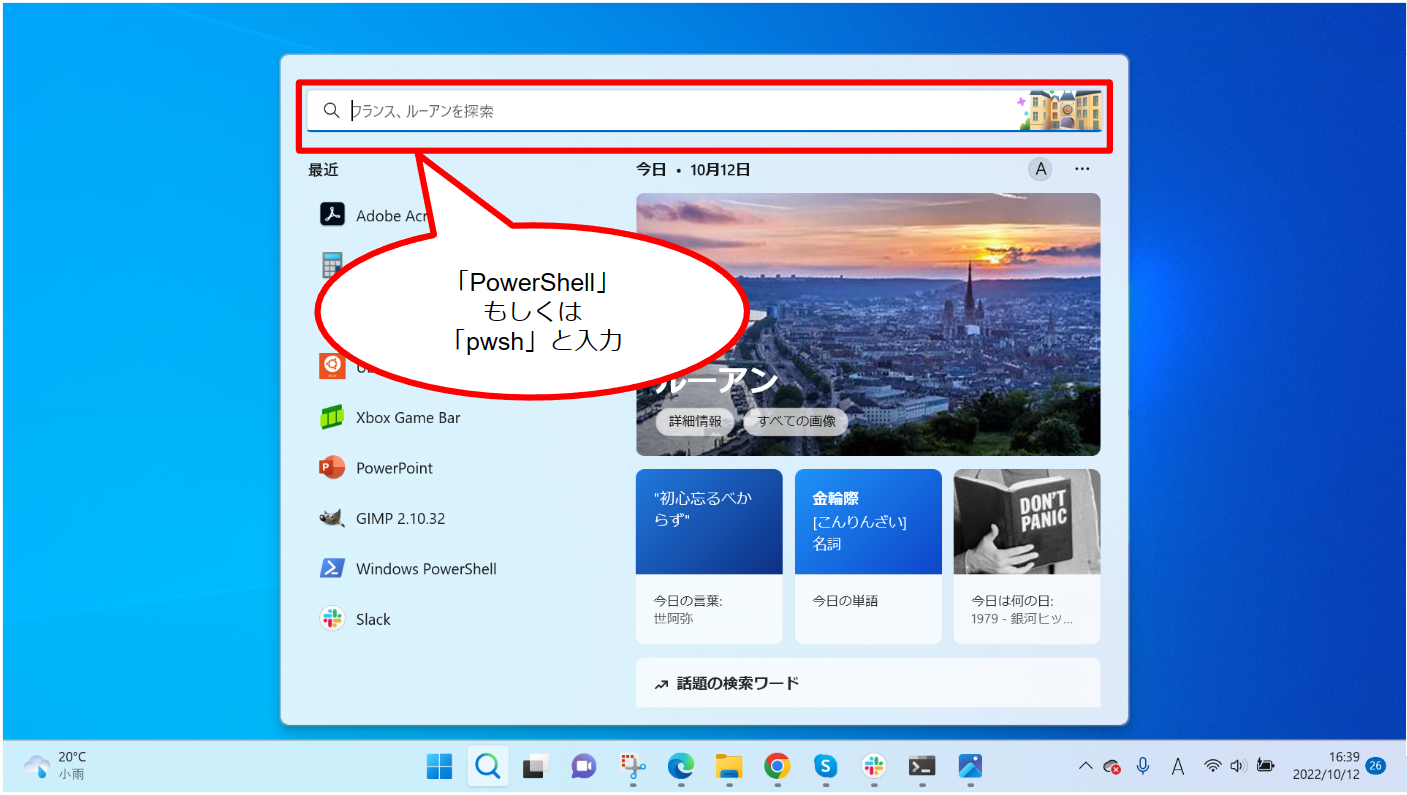
Enter 'PowerShell' or 'pwsh'.
For more information on the differences between "PowerShell" and "pwsh", see FAQ "What are the main differences between PowerShell 5.1 and 7.2.6?".
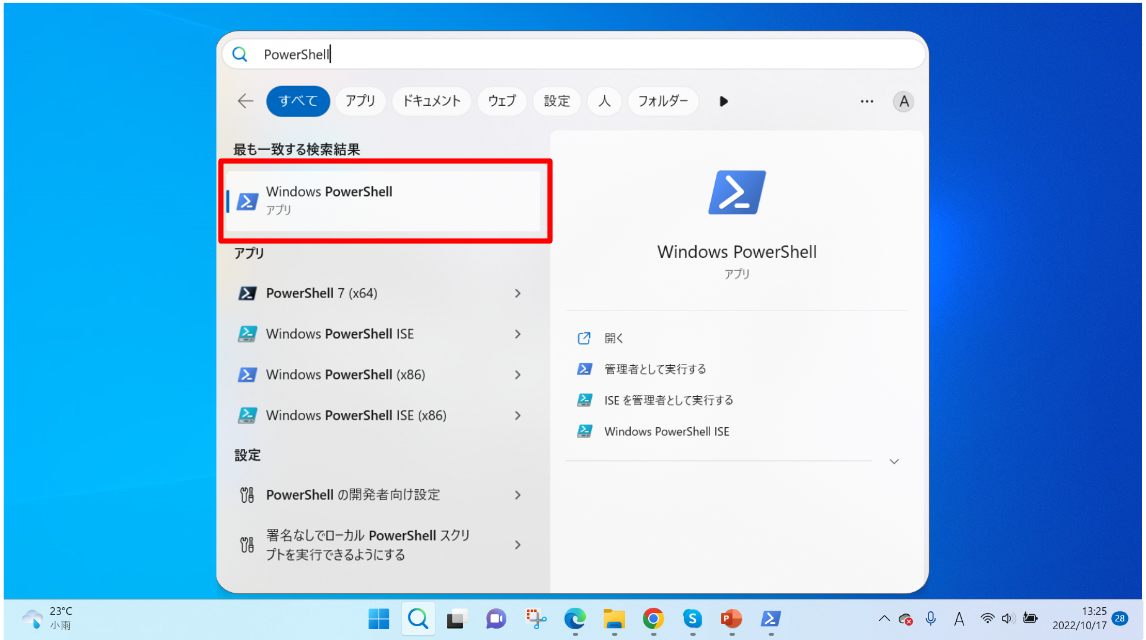
If you entered 'PowerShell', the executable file appears in the search results, as shown in the screen below.
If you entered 'pwsh', the executable file appears in the search results, as shown in the screen below.
If the executable file does not appear in the search results as in the screen below after you entered 'pwsh', the latest version of PowerShell is not yet installed and installation is recommended. Refer to the FAQ "How to install the latest version of PowerShell" to install the latest version of PowerShell.

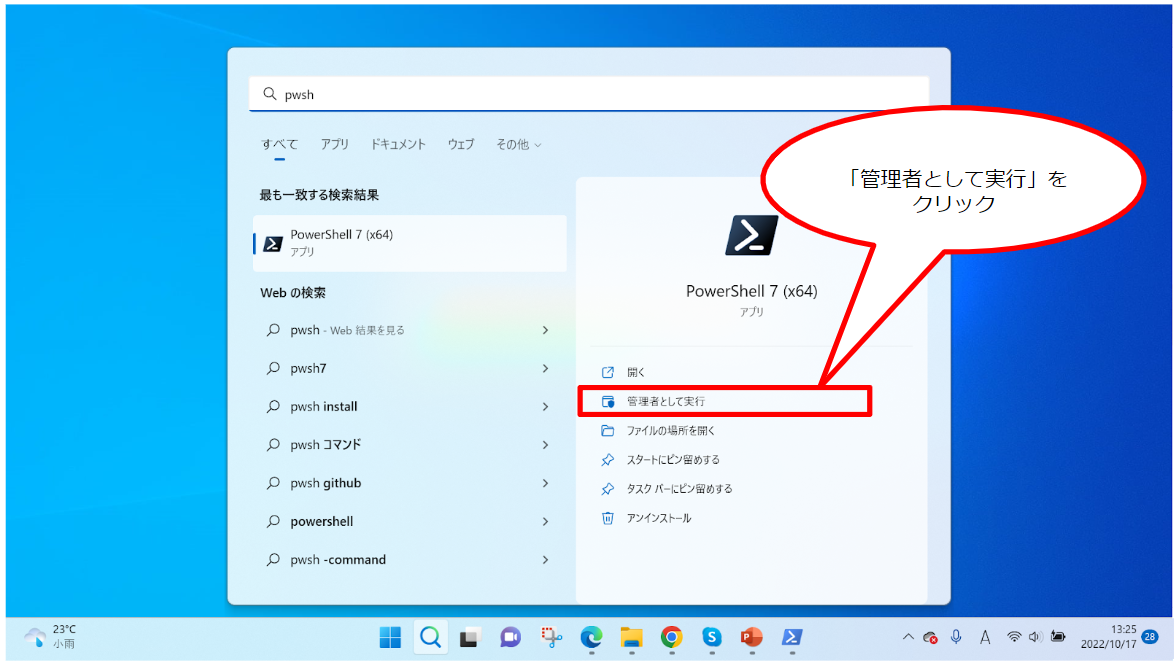
When the executable file appears in the search results, click "Run as administrator".
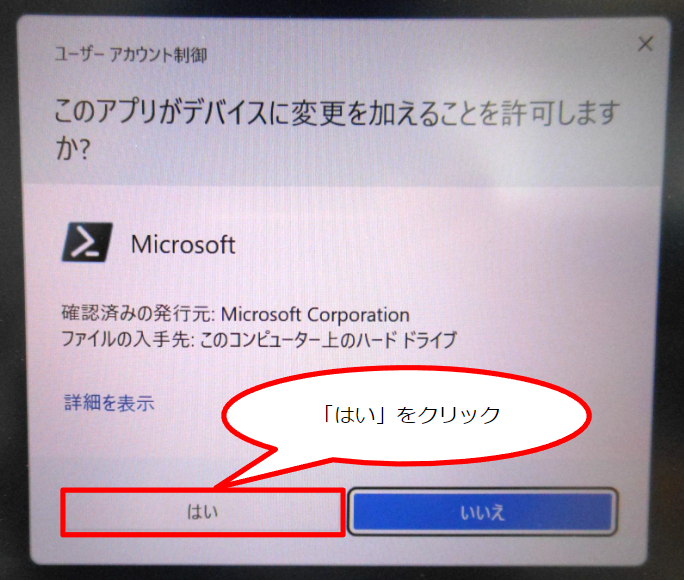
Click 'Yes'.
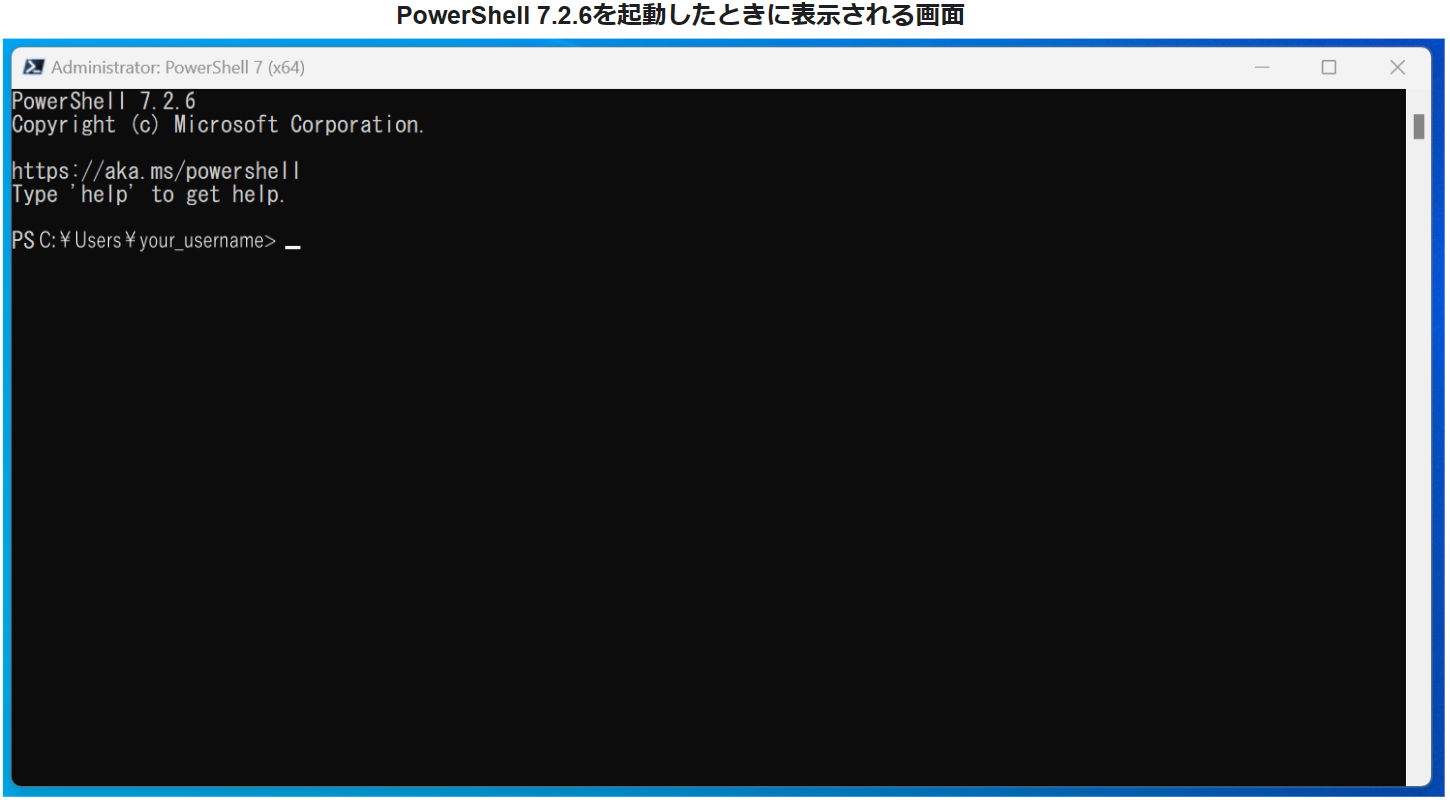
PowerShell will be opened.

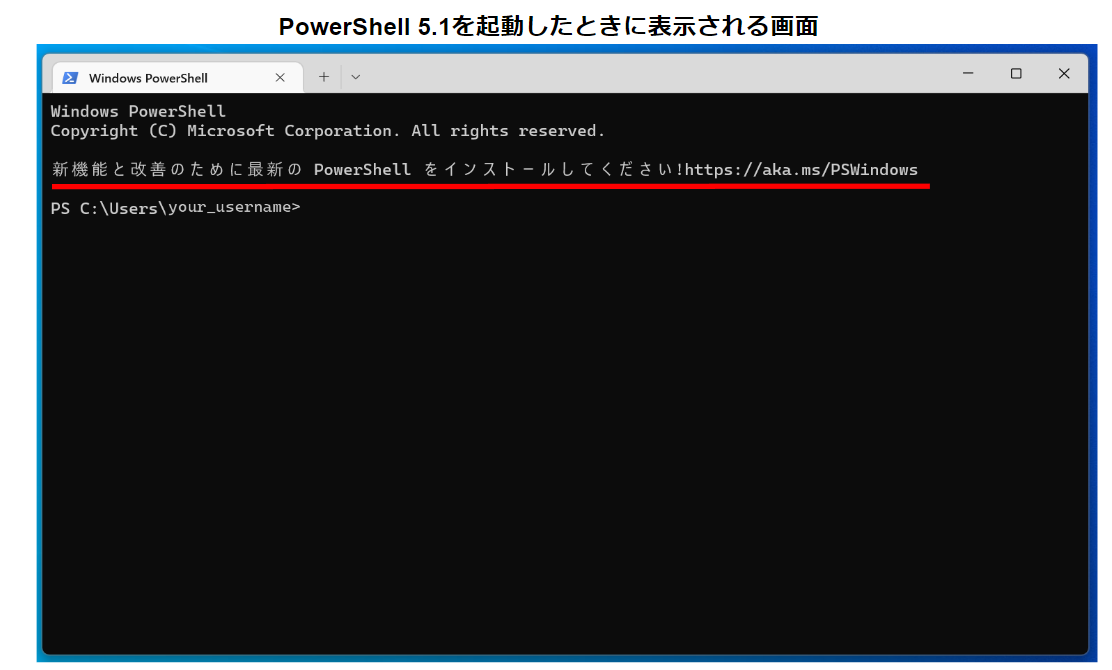
At this time, the PowerShell screen of the user who entered 'pwsh' appears as follows. The display screen shown above is the PowerShell screen when PowerShell 7.2.6, the latest version as of 19 October 2022, is started.
If the following message appears on your screen: you are told "A more up-to-date version has been released, you should upgrade." . Click here to go to the FAQ "How to install the latest version of PowerShell" page to install the latest version of PowerShell.
 A new PowerShell stable release is available: v7.2.7
   Upgrade now, or check out the release page at:
     https://aka.ms/PowerShell-Release?tag=v7.2.7
The PowerShell screen for a user typing 'PowerShell' will appear as follows.
As in this display screen, you may see a message indicating that the version of PowerShell is out of date, as shown in the image below. In that case, it is recommended to upgrade the version of PowerShell before starting the work on this page. For instructions, see "How to install the latest version of PowerShell" on the FAQ page.
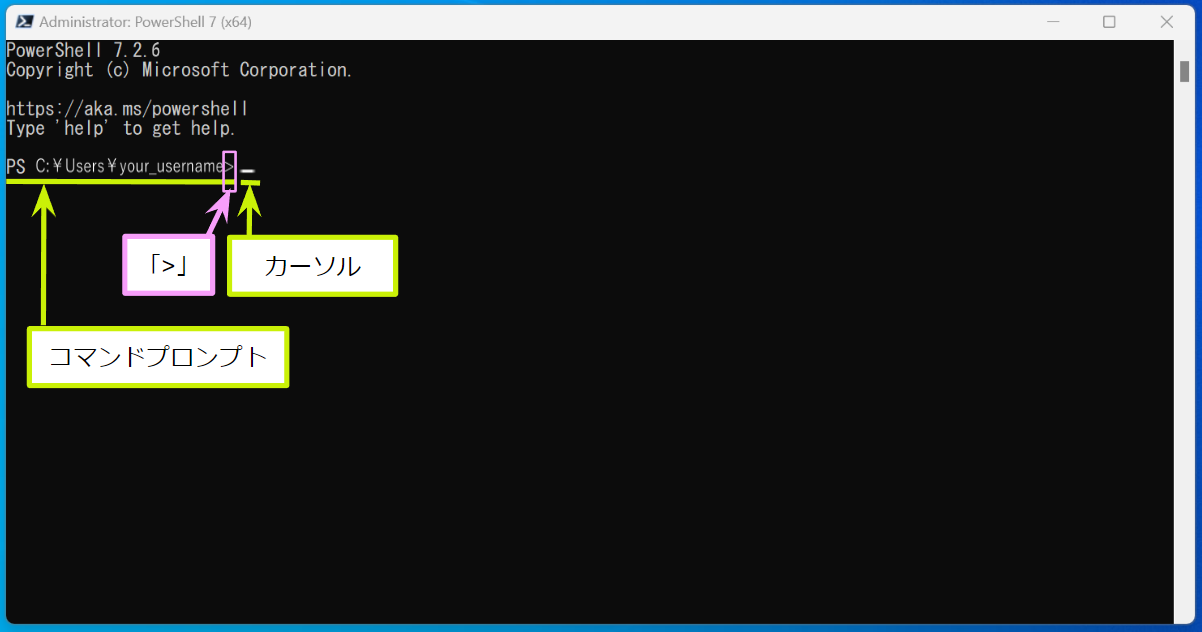
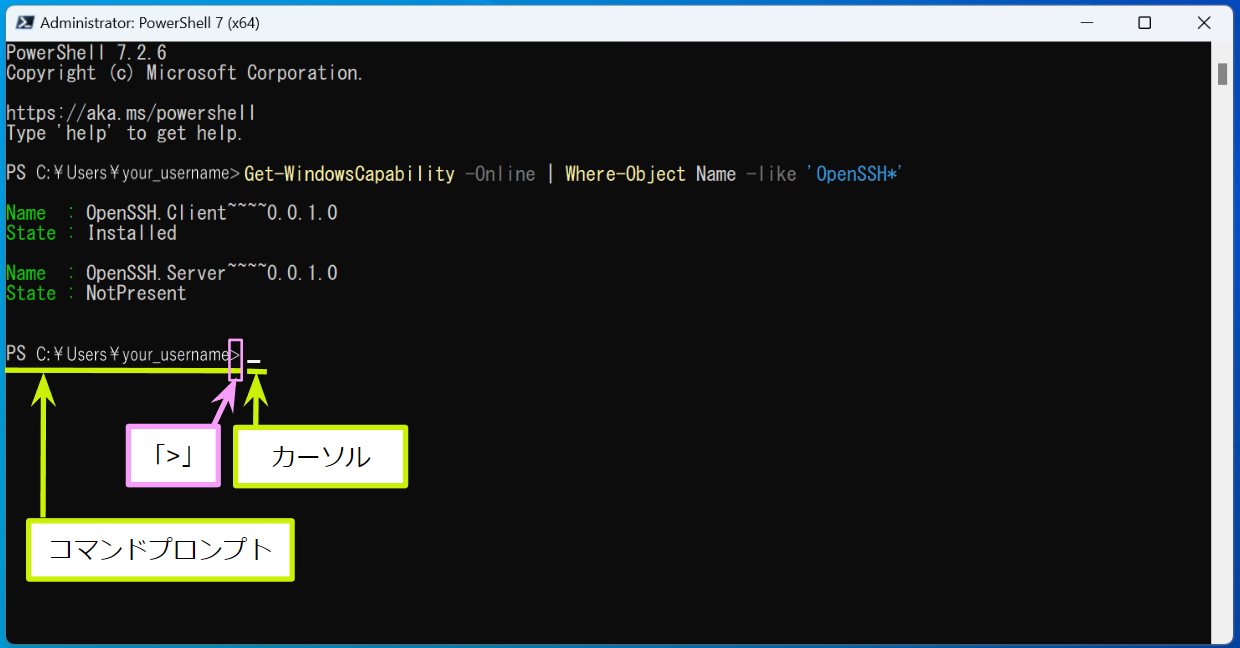
When the Terminal screan appears, you can see a command prompt. It ends with '>'. When it appears, you are ready to enter commands. The blinking square box after this prompt is called Cursor, where you enter commands.
- When entering commands, do not type '>'. It is automatically displayed on PowerShell 7.2.6. You don't need to enter it.
- You don't need to click '>', Cursor or its black screen using the mouse. When Cursor appears, enter the command as it is and press the Enter key. The mouse is not used.
Once you have verified that the command prompt and cursor appear, check that openSSH client is installed before creating the SSH public key and private key.
OpenSSH client is a software, which is used to create SSH public key and private key, and to execute commands to communicate with NIG supercomputer using SSH. If it is not installed, you will not be able to do any further work, so check here.
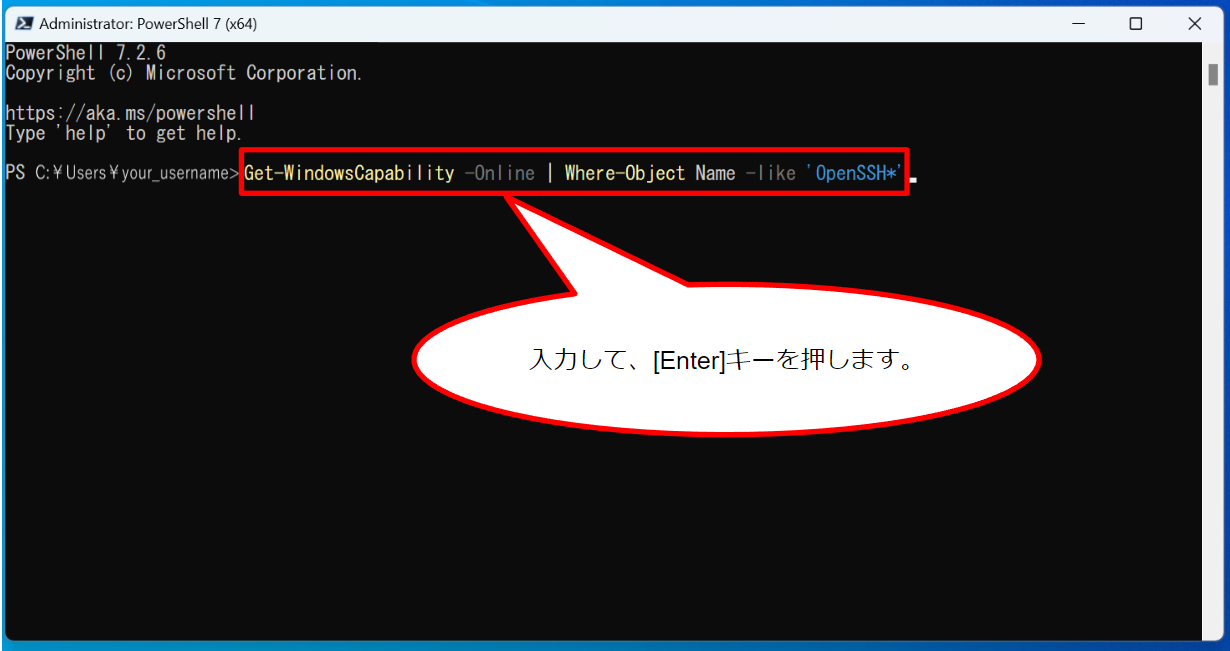
Enter the following command and press the Enter key.
Get-WindowsCapability -Online | Where-Object Name -like 'OpenSSH*'
Then, you will see whether the OpensSSH client is installed on users PC or not, as follows.
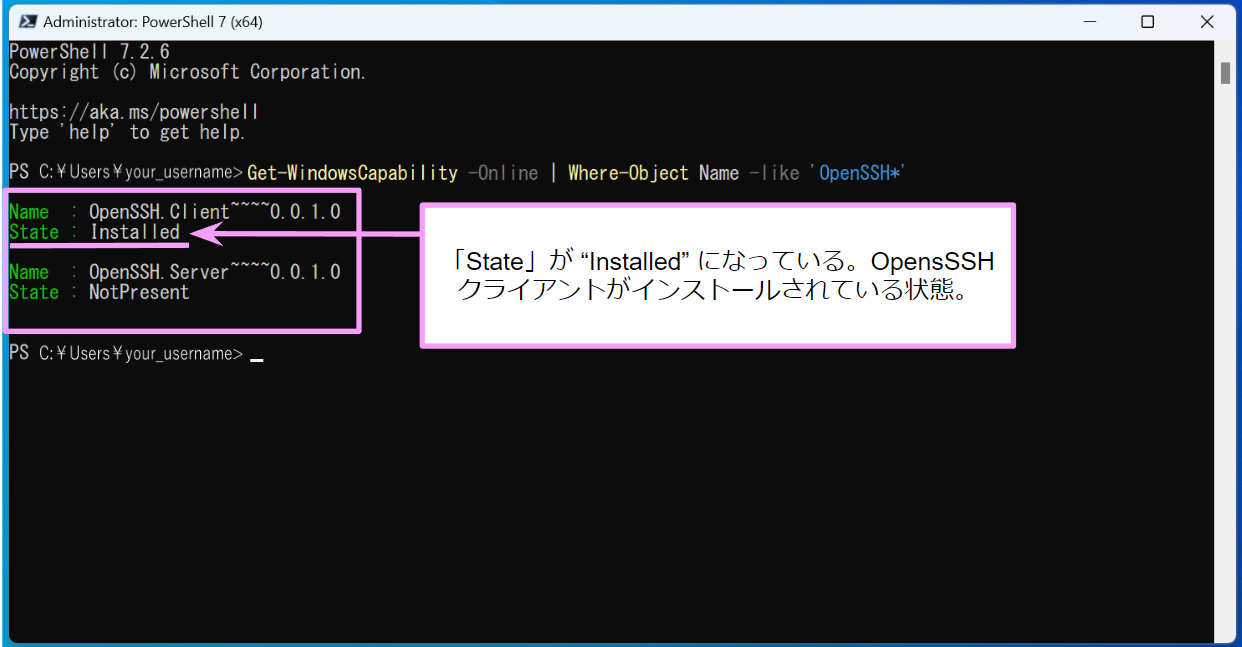
Name  : OpenSSH.Client~~~~0.0.1.0
State : Installed
If 'State' of "OpenSSH.Client~~~~0.0.1.0" is 'Installed', the OpensSSH client is installed. Continue to the next "Create SSH public key and private key".
If it is 'NotPresent', the OpenSSH client is not yet installed. See References and install this software, and then proceed to the next division "Create SSH public key and private key".
Create SSH public key and private key
When a new command prompt and cursor appear on the line following the line showing the status of the OpensSSH client installation, you can type the command again.
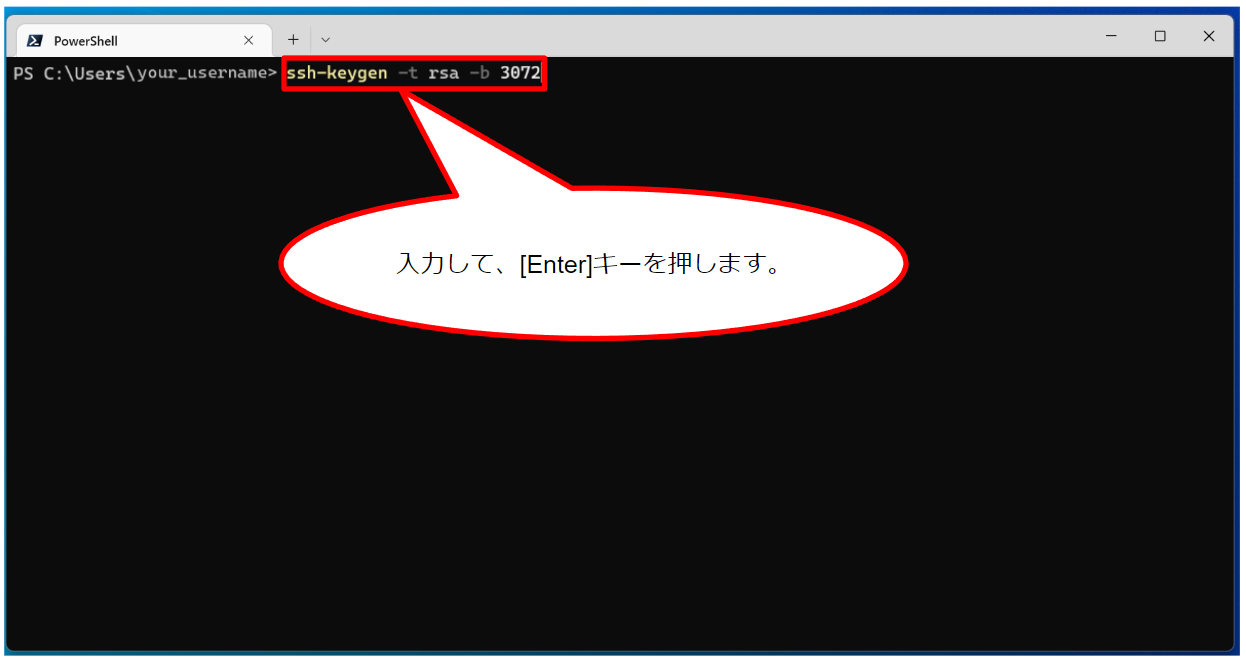
Type the following command and press the Enter key.
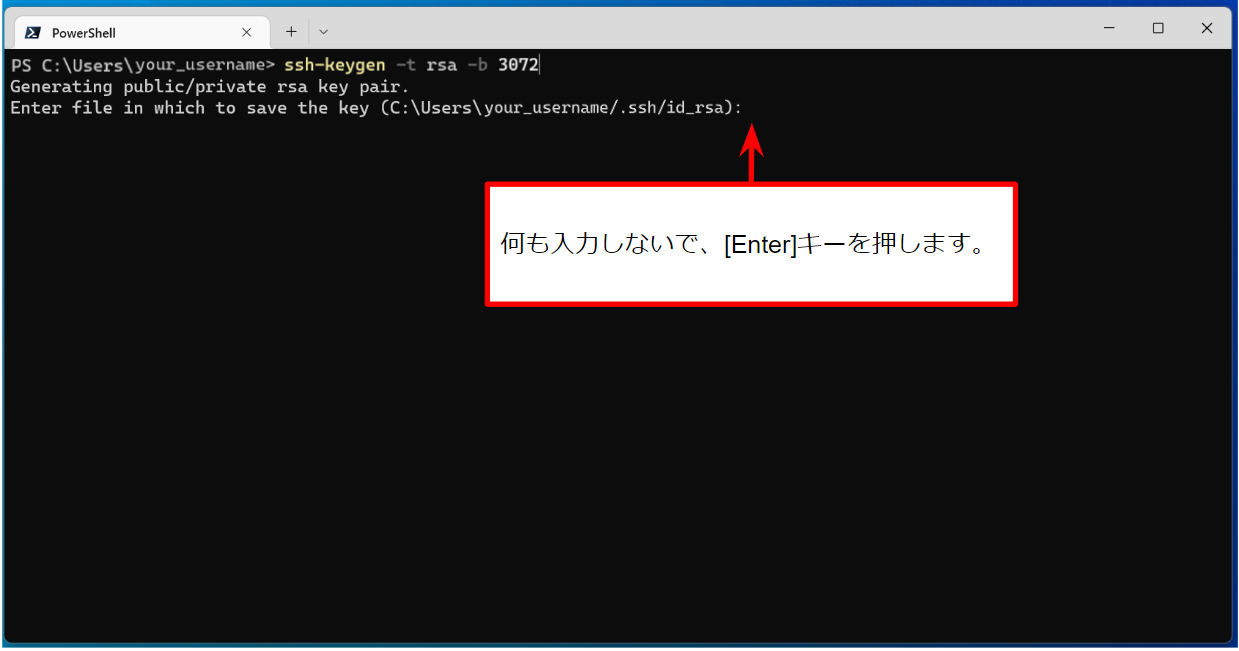
ssh-keygen -t rsa -b 3072
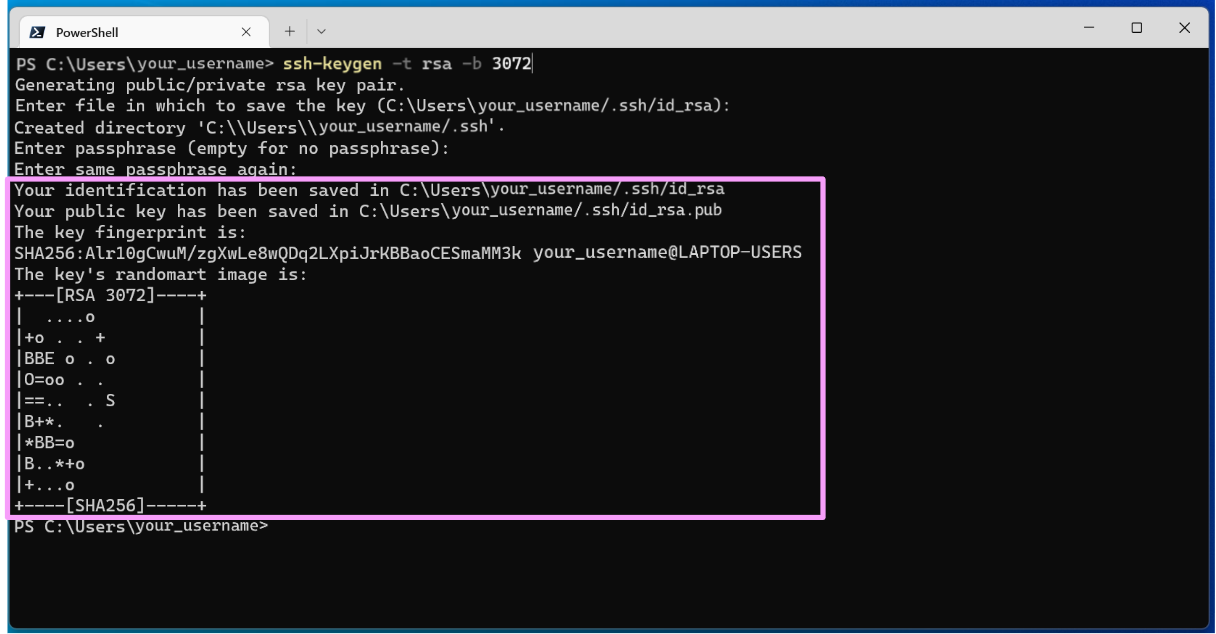
Then, two lines are output as the following screen.
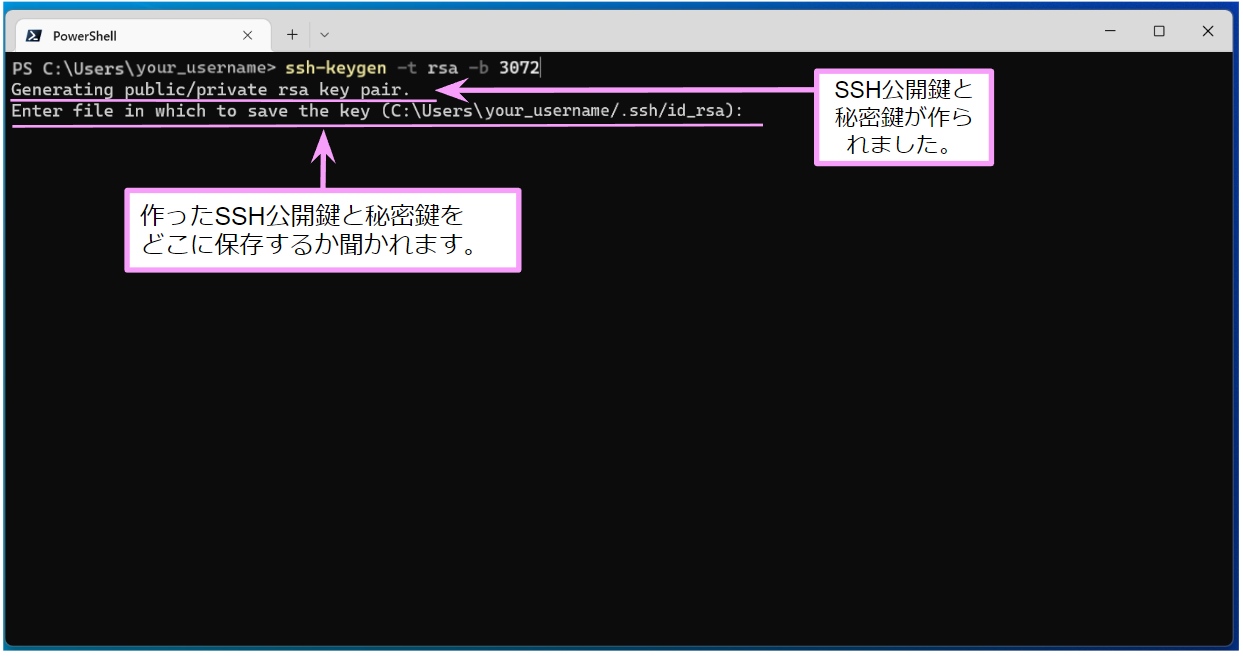
You are asked to Enter file in which to save the key (C:\Users\your_username/.ssh/id_rsa):. This means: "Where in your PC do you want to save the SSH public key and private key you created?".
Normally, do not type anything and just press the Enter key.
Two lines will then be displayed, as shown in the following screen.
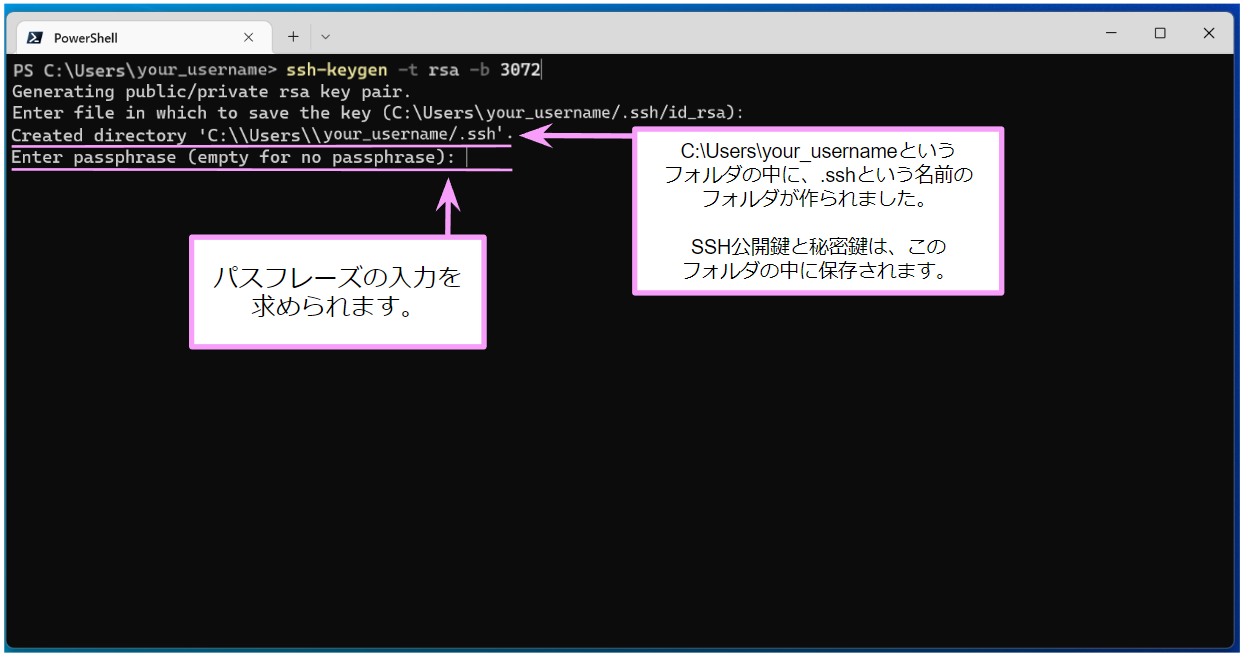
The message Enter passphrase (empty for no passphrase): is displayed. Enter your passphrase here.
The passphrase is different from the NIG supercomputer password. It can be any long string of characters. The passphrase is supposed to be a long random string of characters, including spaces, such as the first line of a page when you open random a book.
| SSH treats possession of a private key file as evidence of identity. If the private key file is stolen, impersonation is possible. Although it is possible to omit the passphrase setting, it is strongly recommended to set it to reduce the damage in the event of private key theft. |
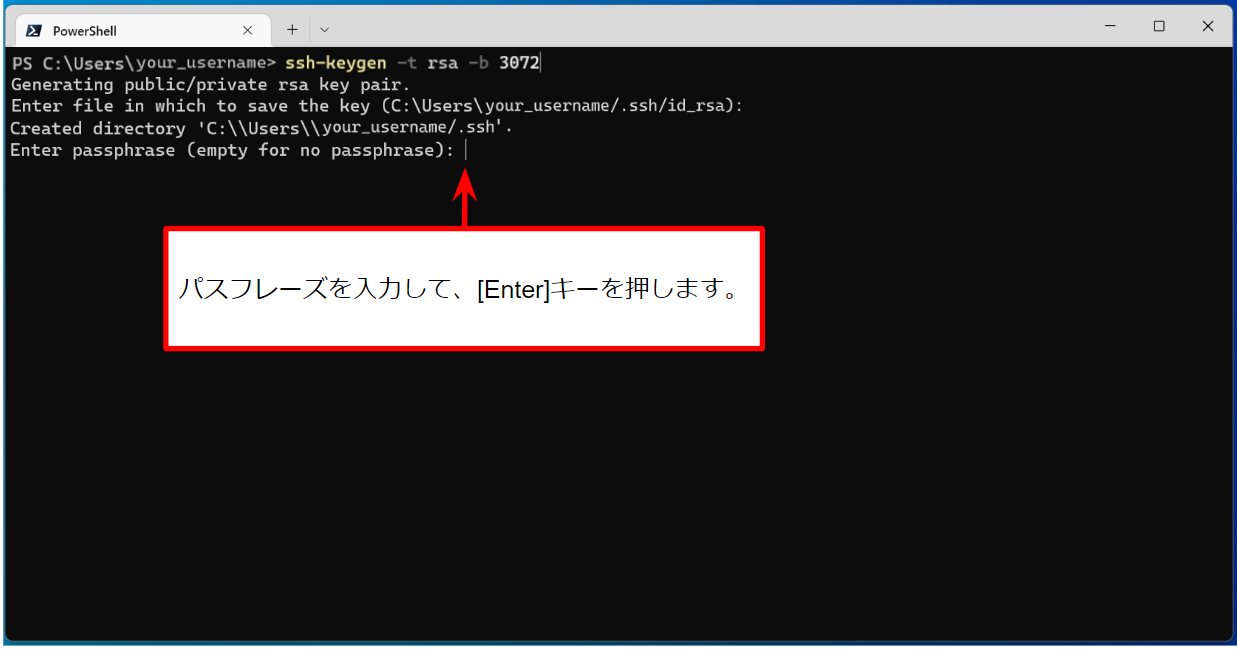
Enter the passphrase and press the Enter key.
❗ After entering the passphrase, the screen remains as shown below and nothing changes. While entering the passphrase, the screen also remains as shown below and nothing changes, but do not worry about it and continue entering. When you have finished typing, press the Enter key.
You will then see the following screen.
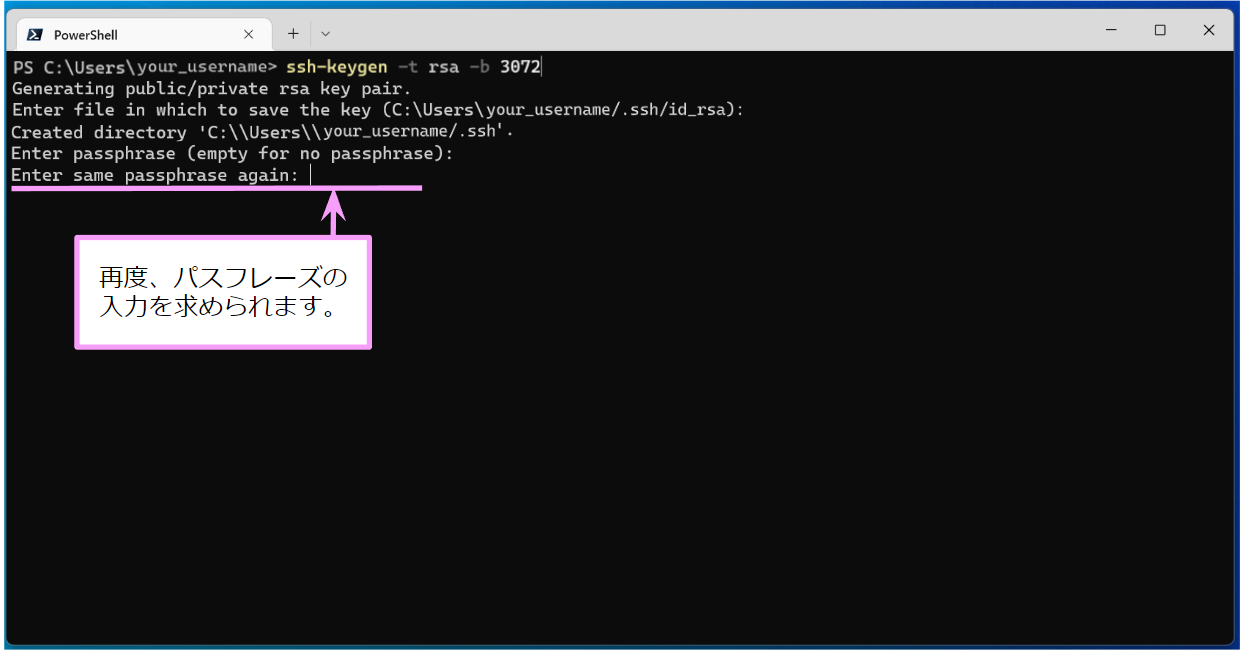
The message Enter same passphrase again: will be displayed. Enter the same passphrase as entered above and press the Enter key.
❗ After entering the passphrase, the screen remains as shown below and nothing changes. While entering the passphrase, the screen also remains as shown below and nothing changes, but do not worry about it and continue entering. When you have finished typing, press the Enter key.
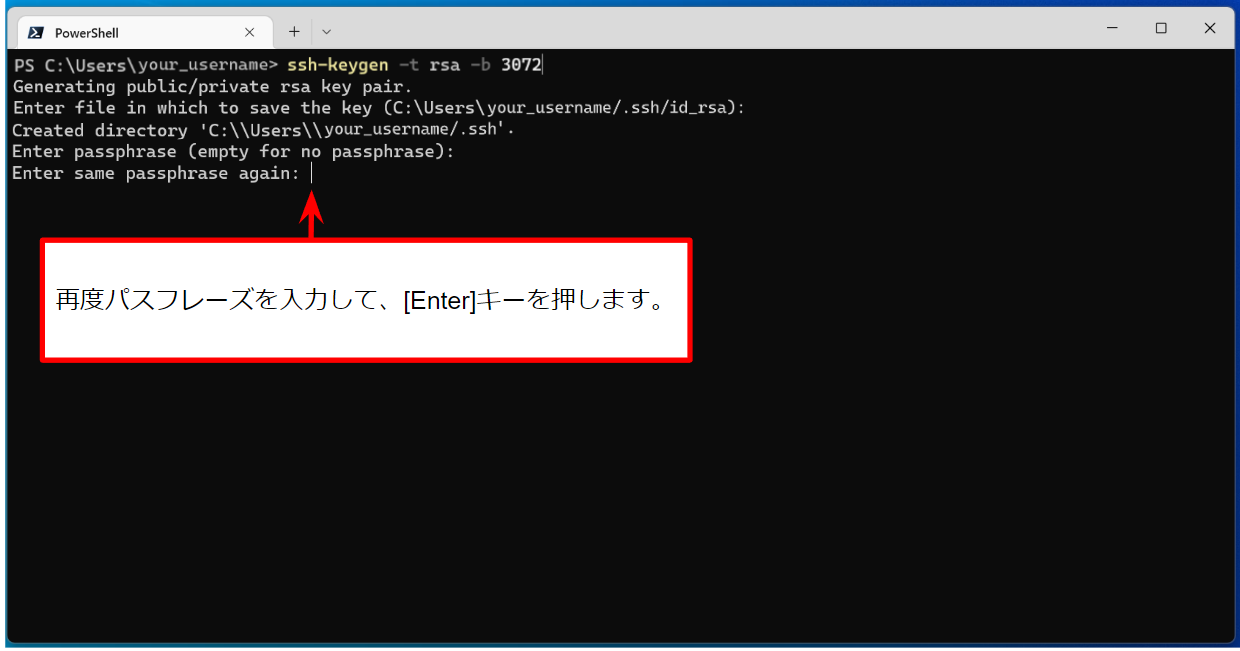
You will then see the following screen.
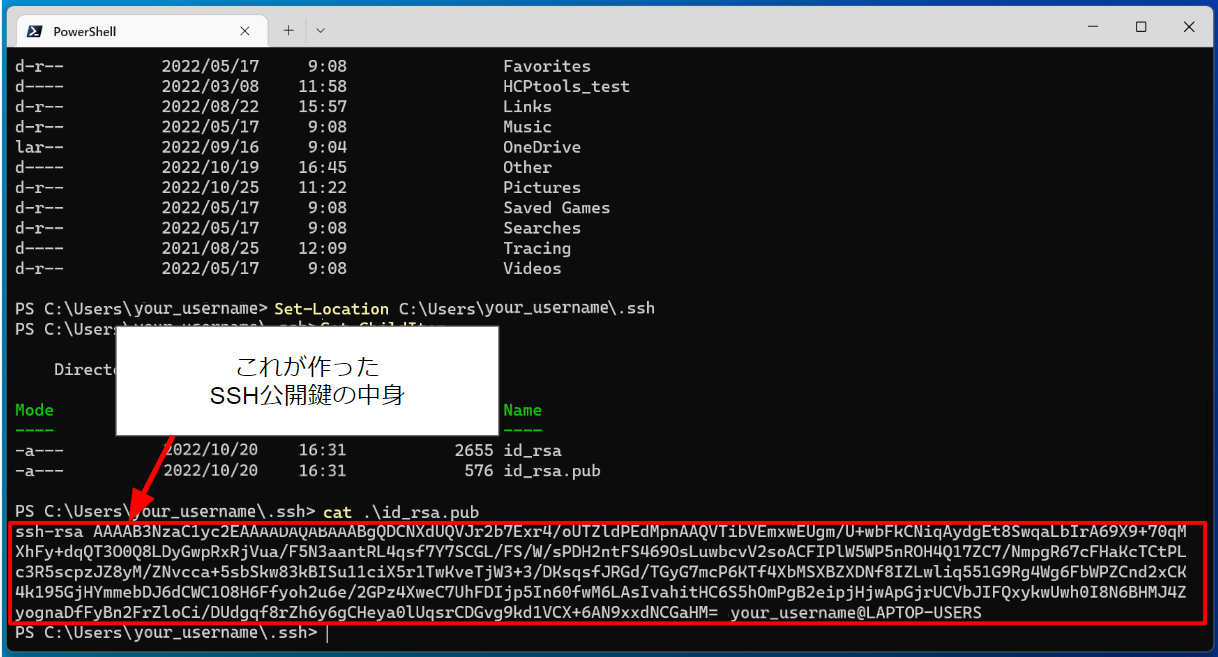
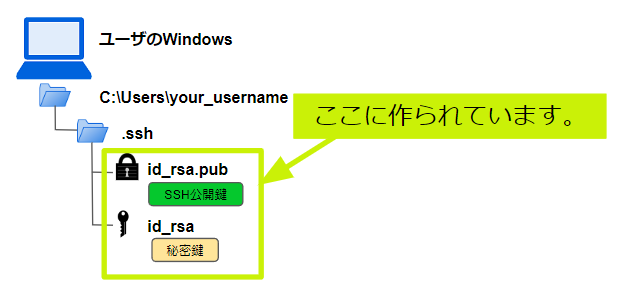
♦Check the existence of the SSH public key and private key you created
Check that the SSH public key and private key are indeed created in the directory C:\Users\your_username/.ssh.
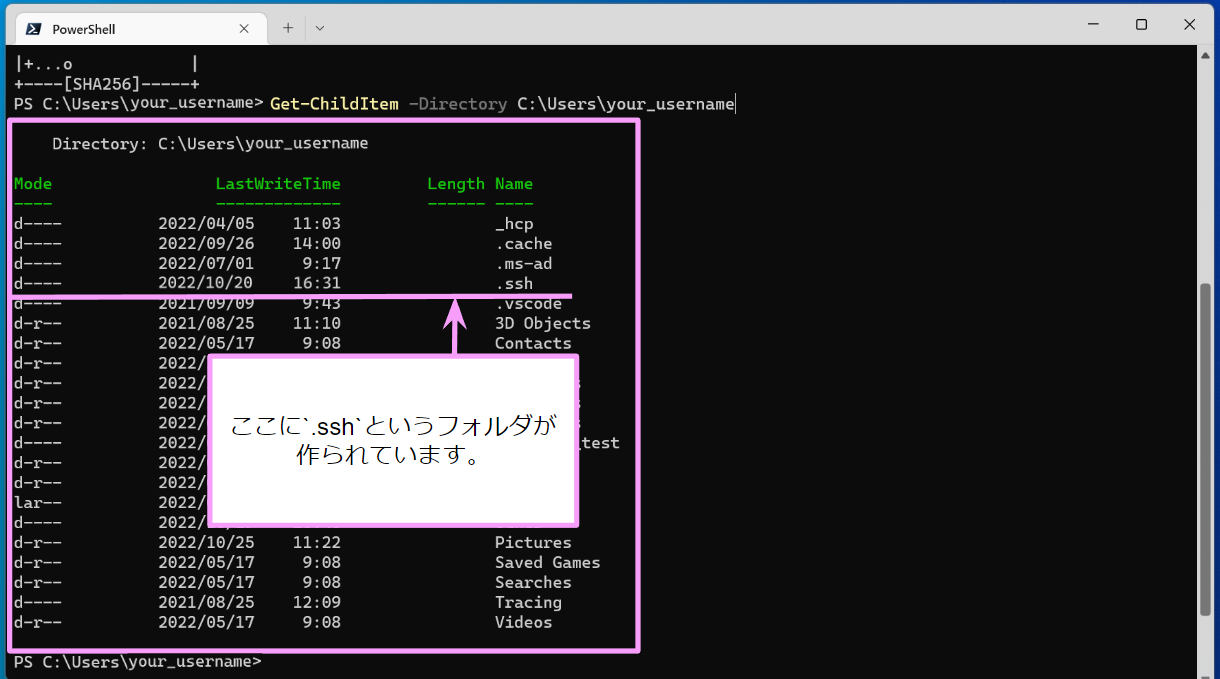
First, to check that the directory named .ssh has really been created, type the following command and press the Enter key.
Get-ChildItem -Directory C:\Users\your_username
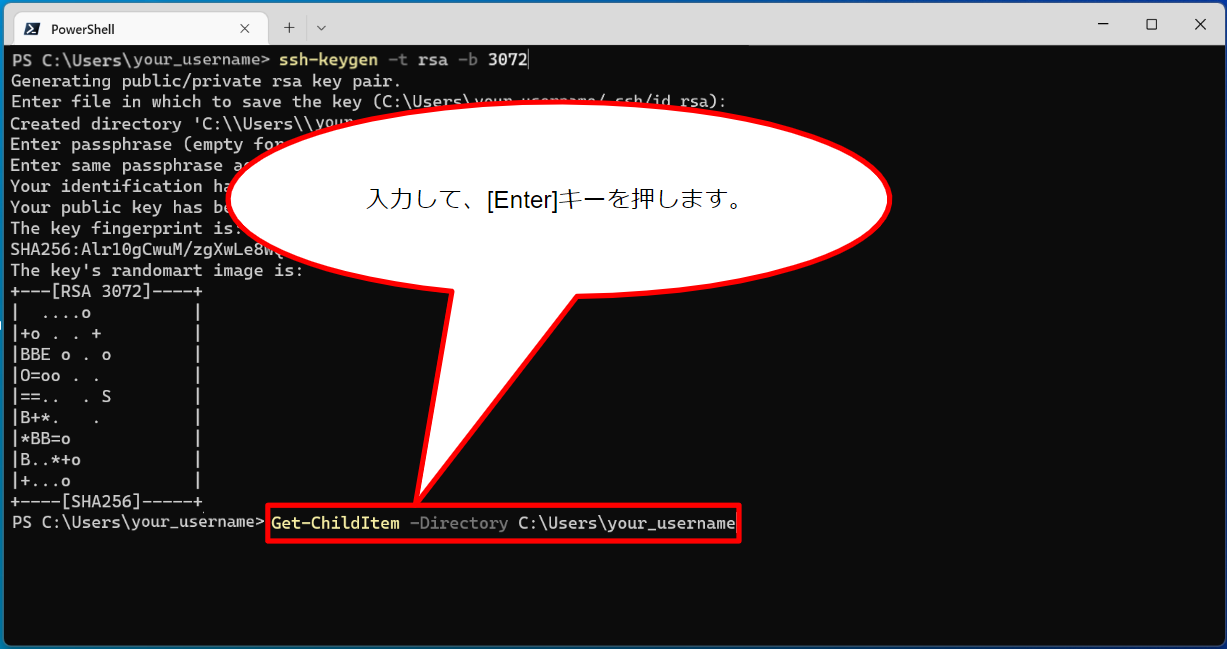
Then, you can confirm the existence of a directory named .ssh in the directory C:\Users\your_username as the following screen.
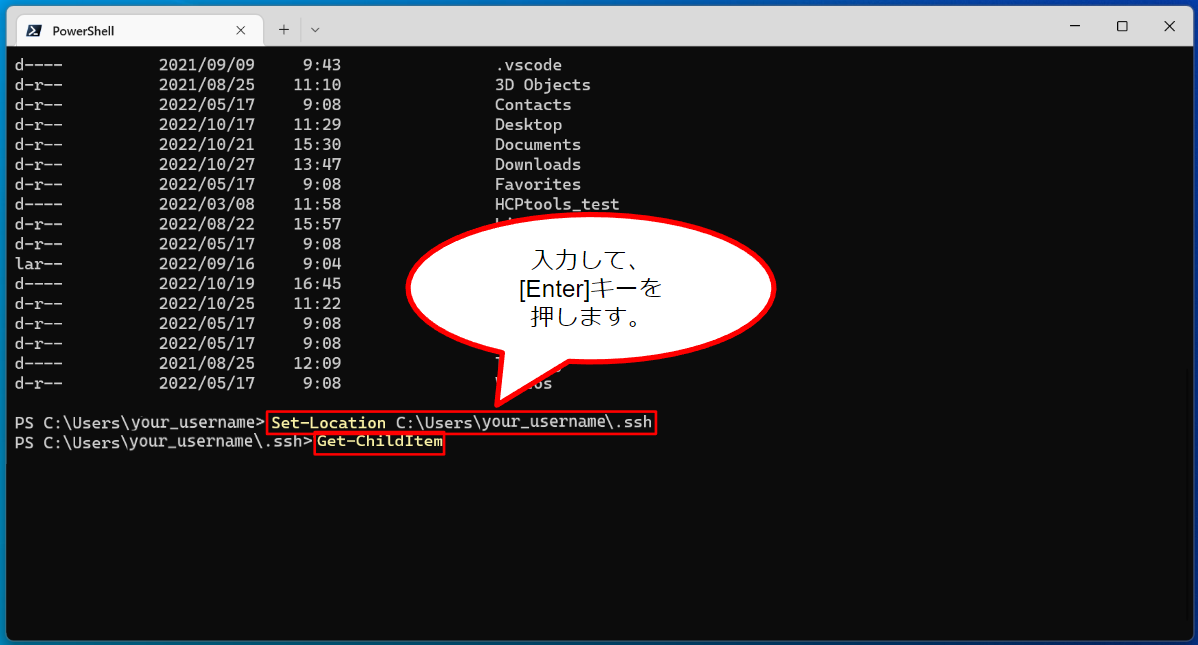
Then, move into the directory named .ssh to check that the SSH public key and private key have indeed been created.
To move into .ssh, type the following command and press the Enter key.
Set-Location C:\Users\your_username\.ssh
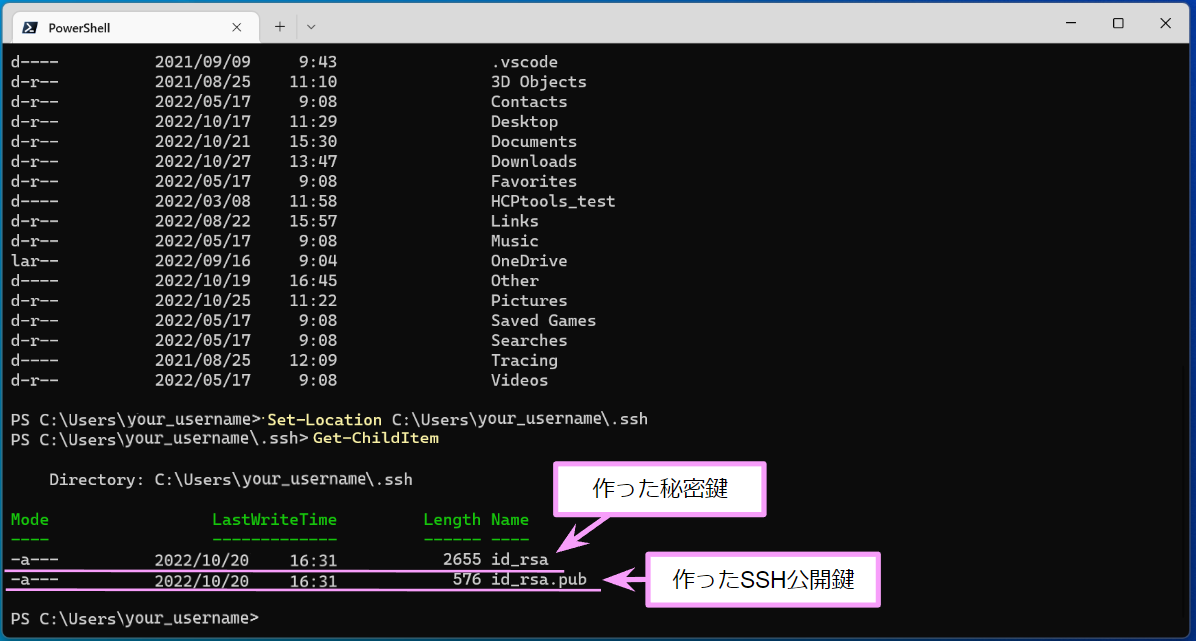
Continue by typing the following command and pressing the Enter key to check that the SSH public and private keys have indeed been created.
Get-ChildItem
you can confirm that the SSH public and private keys have indeed been created as the following screen.
♦Check the SSH public key you created
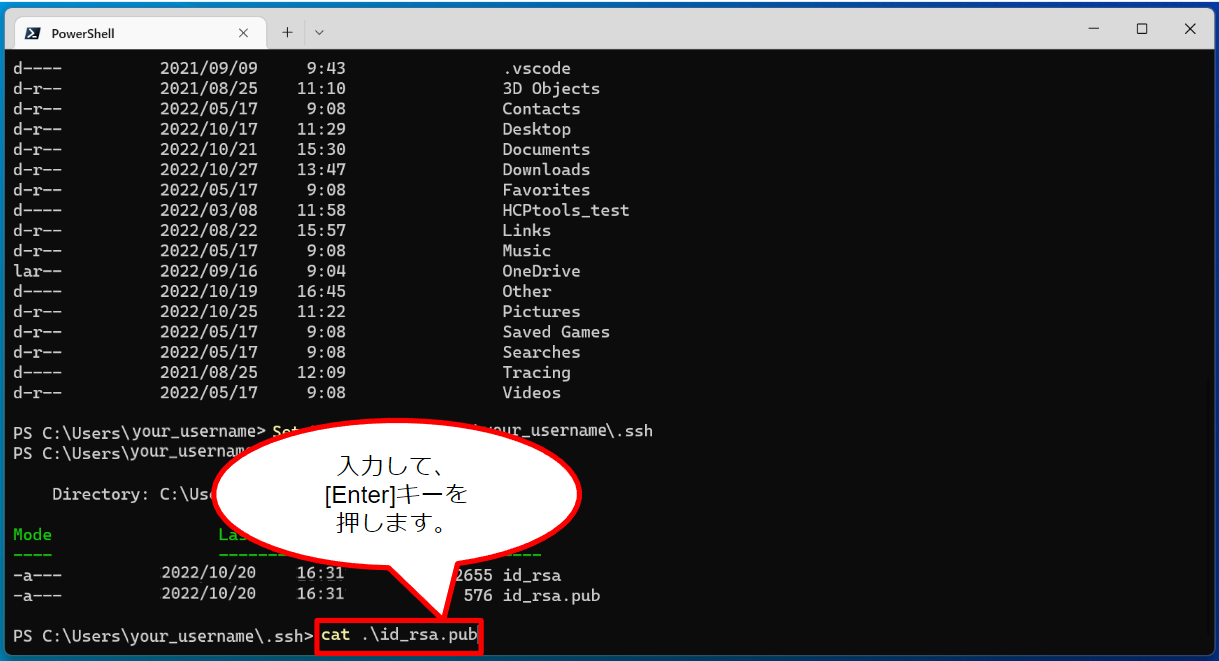
Type the following command and press the Enter key to check the contents of the SSH public key you created.
cat .\id_rsa.pub
Then, the contents of the SSH public key you created are output, as shown in the following screen. It is written in the string.